Now we talk about "Bevel Profile" in 3ds Max modifier, i think it's really "powerful" modeling tools because very easy to use, even for beginner.
1. Start from "Front View" > the go to Create Panel > Shapes > Line > start drawing like this

2. go to Create panel again > Shape > Rectangle

3.Select "Rectangle" > go to Modifier list > Bevel Profile > then Pick Profile > select your Profile

4. Select Object > go ot Bevel Profile > then select "Profile gizmo" > Rotate > change "X" value = 90

5. Result should be like this

6. Copy object, ( Select object + Shift + drag ) choose "Copy" in clone option

7. Select the second object > Bevel Profile > Pick Profile > select other shape

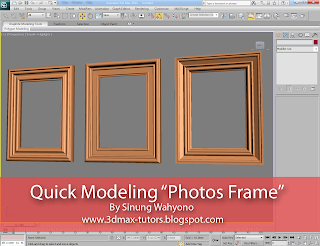
8. Here the final result using 3 different Profile shapes. thank You...! see you in my next tutorials

No comments:
Post a Comment