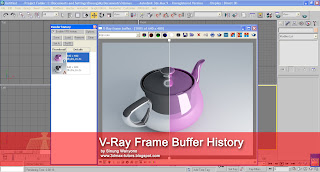
Hi..! nice to see you again, check this mini tutorial about V-Ray Frame Buffer History. it's useful to compare your render images, before and after you apply diferent material,lighting or different effect.
V-Ray Frame Buffer History sangat berguna bagi anda yang ingin mengetahui perbedaan hasil render, sebelum dan sesudah di lakukan perubahan pada material, pencahayaan, atau efek.
Click on the image to enlarger
Klik gambar untuk memperbesar
*Note : this is only in V-ray 2.0 or higher
1. in Render Sutup ( press F10 ) Vray > Frame Buffer > Enable Built-in Frame Buffer > clic on "Show Last VFB" button > click "H" / History > Enable VFB History > cilck "Option" to decide output saving file
di Render setup ( tekan F10 ) Vray > Frame Buffer > aktifkan enable built-in Frame Buffer >klik tombol Show Last VFB > klik Logo "H" / history > aktifkan Enable VFB History > kemudian klik "Option" untuk menentukan lokasi penyimpanan file

2. press F9 to render or click "teapot" icon > Save
Kemudian render ( tekan F9 atau klik ikon Teapot )> Save

3. Try to change with other material > Render again ( F9) > save
Coba ganti material yang berbeda > Render lagi ( F9 ) > Save

4. Click first render image > Set A , then click the second Render image > Set B
then try to move the slider.
Kemudian klik hasil render pertama > Set A ,dan klik hasil render kedua > Set B
kemudian coba geser slide warna putih, anda akan melihat hasil render sebelum dan sesudah.

No comments:
Post a Comment